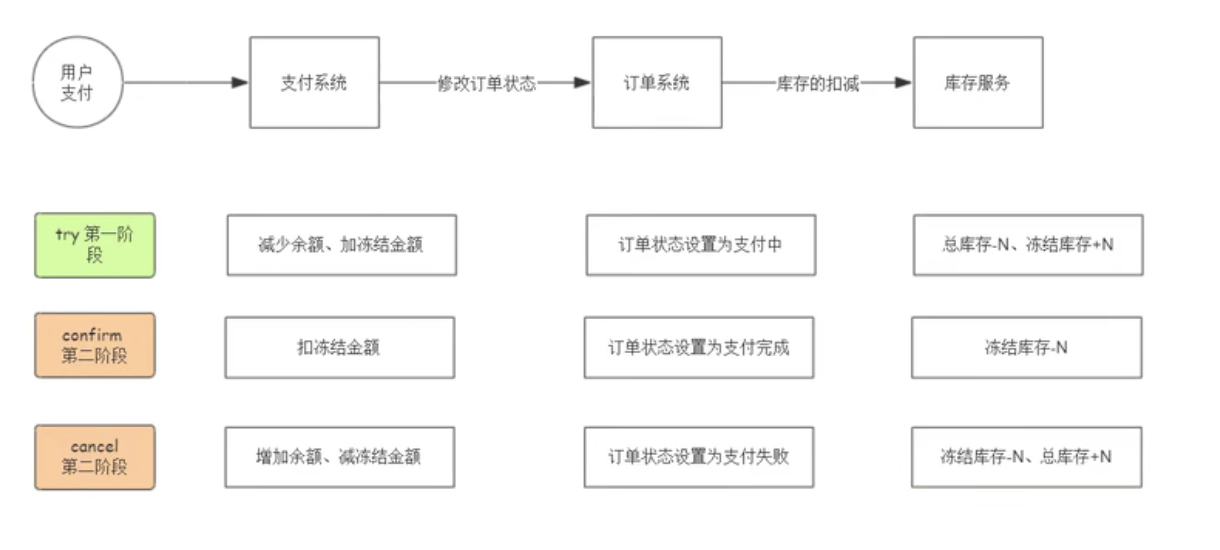
TCC实例
搭建Eureka注册中心
- 第一步搭建SpringBoot环境[父级项目pom文件]
<parent>
  <groupId>org. springframework.boots</groupId>
  <artifactId>spring-boot-starter-parents</artifactIds>
  <version>2.1.1.RELEASE</version>
</parent>
- 第二步搭建Springcloud环境[父级项目pom文件]
<dependencyManagement>
 <dependencies>
  <dependency>
   <groupId>org.springframework.clouds/aroupId>
   <artifactId>spring-cloud-dependenciess/artifactId>
   <version>Greenwich.SR3s/version>
   <type>pom</type>
   <scope>imports/scope>
  </dependency>
 </dependenciesx
</dependencyManagement>
- 第三步添加SpringBoot依赖、 Eureka Server依赖[Eureka项目pom文件]
<dependency>
   <groupId>org.springframework.boots/groupId>
   <artifactId>spring-boot-starter-webs/artifactId>
</dependency>
<dependency>
   <groupId>org. springframework.cloud</groupId>
   <artifactId>spring-cloud-starter-netflix-eureka-server</artifactId>
</dependency>
- 第四步创建SpringBoot主启动类、使用
@EnableEurekaServer注解
@SpringBootApplication
//Eureka server 项目
@EnableEurekaserver
public class EurekaServerApp {
	public static void main(Stringl] args) ( SpringApplication. run (EurekaServerApp.class);
	}
}
- 第五步添加application.yml配置文件,配置eureka服务端
#微服务的名称
spring.application.name: fencai-vip-eureka-single
#微服务的服务端口
server.port: 8760

eureka:
	server:
		enable-self-preservation: false
	instance:
	client:
		registerWithEureka: false
		fetchRedistry: false
		serviceurl:
			defaultzone: http://localhost:8769/eureka/
第六步启动项目,浏览器访问http://1ocalhost: 8760/
TCC转账项目数据库实体创建
创建tcc数据库
CREATE DATABASE téc DEFAULT CHARACTER SET utf8;
创建扣钱数据库、加钱数据库
CREATE DATABASE account_from DEFAULT CHARACTER SET utf8;
CREATE DATABASE account_to DEFAULT CHARACTER SET utf8;
账户实体
|字段编码|字段类型|字段名称| |——-|——-|——-| |id|bigint|主键| |name|varchar(256)|用户名称| |balance|decimal(20,2)|账户余额|
项目初始化sql
-------------------------------------------------
CREATE DATABASE tcc DEFAULT CHARACTER SET utf8;

-------------------------------------------------
CREATE DATABASE account_from DEFAULT CHARACTER SET utf8;
USE account_from
CREATE TABLE 'account' (
 'id' bigint (20) NOT NULL AUTO-INCREMENT COMMENT '物理主键',
 'name' varchar (256) NOT NULL DEFAULT '' COMMENT '用户名称',
 'balance decimal(20,2) NOT NULL DEFAULT '0.0'' COMMENT '账户余额',
 PRIMARY KEY ('id')
);

SET SQL_SAFE_UPDATES=0;
delete from account_from.account;
insert into account_from. account (id, name, balance) values(1,'张三',100);
SELECT * FROM account_from. account;

-------------------------------------------------

CREATE DATABASE account_to DEFAULT CHARACTER SET utf8;
USE account_to:
CREATE TABLE 'account' (
	'id' bigint (20) NOT NULL AUTO-INCREMENT COMMENT '物理主键',
	'name' varchar (256) NOT NULL DEFAULT '' COMMENT '用户名称',
	'balance' decimal (20,2) NOT NULL DEFAULT '0.00' COMMENT '账户余額',
PRIMARY KEY ('id')
);

SET SQL SAFE_UPDATES-8;
delete from account_to.account;
insert into account to. account(id, name, balance) values(10001,'四.,180) ;
SELECT * FROM account_to.account;
加钱服务和扣钱服务的MyBatis集成
- 第一步,添加Mybatis项目依赖
<dependency>
	<groupId>orq.mybatis.spring.boot</groupId>
	<artifactId>mybatis-spring-boot-starters</artifactId>
	<version>1.2.8</version>
</dependency>
- 第二步,添加MySQL驱动依赖
<!-- MYSQL -->
<dependency>
	<groupId>mysql</groupId>
	<artifactId>mysql-connector-java</artifactId>
</dependency>
- 第三步,application.yaml文件配置数据库连接池
# 驱动
spring.datasource.driver-class-name: com.mysql.jdbc.Driver
# 数据库的地址(account_to与account_from)
spring.datasource.url: jdbc:mysql://192.168.8.248:3386/account_to?
characterEncoding-UTF-8

spring.datasource.username: root
spring.datasource.password: 123456

# 映射使用驼峰规则
mybatis.configuration.map-underscore-to-camel-case: true
mybatis.configuration.use-generated-keys: true
-
第四步创建mapper接口,使用
@Update注解 @Repository public interface AccountMapper { @update(“update account ket balance = balance + #(balance) where id=#(id)”) Long update(Account account); } -
第五步SpringBoot项目主启动类使用
@MapperScan注解
@SpringBootApplication
//扫描mapper包的路径
@MapperScan("com.fencaibc.himly.account.to.mapper")
@EnableEurekaclient
public class AccountToApp{
	public static void main(String[] args){
		ApplicationContext context = SpringApplication.run(AccountToApp.class);
	}
}
扣钱服务集成Feign
- 第一步加钱服务添加Restful Api接口
//加钱的API Restful
@RequestMapping("/account/{id)/{transMoney}")
public String account(@PathVariable("id) Long id, @PathVariable( "transMoney") BigDecimal transMoney)
 	Account account = new Account();
 	account.setId(id);
 	account.setBalance(transMoney);
 	accountService.update(account):
 	return "true":
}
- 第二步添加Feign项目依赖
<dependency>
	<groupId>org. springframework.clouds/groupId>
	<artifactId>spring-cloud-starter-openfeigns/artifactId> </dependency>
- 第三步使用Feign接口调用
加钱服务Restful Api
//value = 加钱的微服务名称,也是在eureka注册中心里的微服务的名称
@Feignclient(value = "account-to")
public interface Accountclient{
	@RequestMapping(value ="/account/(id)/(transMoney)") String account(@PathVariable("id") Long id,@PathVariable("transMoney") BigDecimal transMoney);
}
- 第四步,Springboot主启动类中使用
@EnableFeignclients
@SpringBootApplication
@EnableFeignclients
public class AccountFromApp {
	public static void main(Stringl] args) SpringApplicarion run(AccountFromApp.class)
	}
}
【加钱】服务集成Himly
- 第一步添加Himly项目依赖
<dependency>
<groupId>org.dromaras/groupIds
<artifactId>hmily-spring-boot-starter-springclouds/artifactId
<version2.8,5-RELEASEs/version»
</dependency>
- 第二步Springboot application.yml文件配置Himly
# serializer :这里我推荐使用是kroy.当然hmily也支持hessian, protostuff, jdk.在我们测试中表现为: kroy>hessian-protostuff>idk
# recoverDelayTime :定时任务延迟时间(单位是秒,默认128),这个参数只是要大于你的rpc调用的超时时间设置。
# retryMax :最大重复次数,默认3次,当你的服务down机,定时任务会执行retryMax次数去执行你的cancel还是confrim
# bufferSize: disruptor的bufferSize,当高并发的时候,可以调大。注意是2n次方
# started:注意在是发起方的时候,把此属性设置为true,参与方为false。(重要)
# asyncThreads异步执行confirm和cancel线程池线程的大小,高并发的时候请调大
# 按下来是最重要的事务日志的存储在我们的压测中,推荐使用mongo.表现为mongodb>redis集群>mysql>zookeeper

org:
	dromara:
		hmily:
			serializer: kryo
			recoverDelayTime: 128
			retryMax: 38
			scheduledDelay: 128
			scheduledThreadMax: 18
			repositorySupport: db
			started: false #参与方为true
			hmilyDbConfig:
				driverClassName: com.mysql.jdbc.Driver
				url: jdbc:mysq1://192.168.8.248:3386/tcc?useUnicode=true&characterEncoding=utf8
				username: root
				password: 123456
- 第三步编写Himly TCC三大方法
// Try方法要有@Hmily
@Hmily (confirmMethod ="confirmMethod", cancelMethod ="cancelMethod")
public void tryMethod(Account account){
	System.out.printin("入账开始");
}
public void confirmMethod (Account account){
	System.out.printin("入账确认");
	accountMapper.update (account);
}

public void cancelMethod(Account account) {
	System.out.printin("入账取消 空操作);
}
【扣钱】服务集成Himly
- 第一步添加Himly项目依赖
<dependency>
<groupId>org.dromaras/groupIds
<artifactId>hmily-spring-boot-starter-springclouds/artifactId
<version2.8,5-RELEASEs/version»
</dependency>
- 第二步Springboot application.yml文件配置Himly
# serializer :这里我推荐使用是kroy.当然hmily也支持hessian, protostuff, jdk.在我们测试中表现为: kroy>hessian-protostuff>idk
# recoverDelayTime :定时任务延迟时间(单位是秒,默认128),这个参数只是要大于你的rpc调用的超时时间设置。
# retryMax :最大重复次数,默认3次,当你的服务down机,定时任务会执行retryMax次数去执行你的cancel还是confrim
# bufferSize: disruptor的bufferSize,当高并发的时候,可以调大。注意是2n次方
# started:注意在是发起方的时候,把此属性设置为true,参与方为false。(重要)
# asyncThreads异步执行confirm和cancel线程池线程的大小,高并发的时候请调大
# 按下来是最重要的事务日志的存储在我们的压测中,推荐使用mongo.表现为mongodb>redis集群>mysql>zookeeper

org:
	dromara:
		hmily:
			serializer: kryo
			recoverDelayTime: 128
			retryMax: 38
			scheduledDelay: 128
			scheduledThreadMax: 18
			repositorySupport: db
			started: true #发起方为true
			hmilyDbConfig:
				driverClassName: com.mysql.jdbc.Driver
				url: jdbc:mysq1://192.168.8.248:3386/tcc?useUnicode=true&characterEncoding=utf8
				username: root
				password: 123456
- 第三步编写Himly TCC三大方法
//@Hmily修饰的非抽象方法一定是try方法
@Hmily(confirmMethod = "confirmUpdate", cancelMethod = "cancelUpdate")
public void update(Long id, BigDecimal transMoney, Long toId) {// try
	Account account = new Account();
	account.setId(id);
	account.setBalance(transMoney.negate());
	accountMapper.update (account); //扣钱
	accountclient.account(toId. transMoney);//feign调用加钱服务的try接口
	System.out.printIn("扣钱");
	//throw new RuntimeException("假如出账失败");
}

public void confirmUpdate(Long id, BigDecimal transMoney, Long told) {
	System.out.printin("扣钱确认");
}
public void cancelUpdate(Long id, BigDecimal transMoney, Long told) {
	Account account = new Account();
	account.setId(id);
	account.setBalance(transMoney):
	accountMapper.update(account):
	System.out.print1n("扣钱取消");
}
- 第四步,Feign借口需要使用@Hmily
@Feianclient(value = "account-to")
public interface AccountClient
	// feign调用加钱服务的try接口,需要使用@Hmily注解
	@Hmily
	@RequestMapping(value ="/account/(id)/(transMoney)")
String account(@PathVariable("id) Long id,
@PathVariable("transMoney) BigDecimal transMoney);
TCC异常分析
第一阶段异常
第一阶段异常=try阶段异常
第二阶段调用cancel方法, cancel要保证一定执行成功【通过不断的重试来保障,如果超过重试的次数,需要手工介入】
第二阶段异常
第二阶段回滚异常, cancel 异常
只要try方法失败, cancel方法必须成功,重试任务要进行重试,重试不成功继续重试
如果第二阶段一直回滚异常,需要人工介入
空回滚
try方法没有执行【try方法网络超时】。cancel执行了
- 通过事务控制表来识别空回滚【在cancel方法中识別出try方法有没有执行】
- 转账业务每次try写一条扣20元的流水【没有流水,try就没有执行】
二阶段重复提交
cancel方法和confirm方法做幂等控制。【加钱、扣钱都只能执行一次】
防悬挂
Cancel方法比Try方法先执行。【try-直网路超时,然后执行Cancel. Cancel执行完了,Try请求才到】。虽事务失败了,但是事务结束了。try方法一定不能执行。
需要在try方法中检查事务是否结束
TCC电商系统编程模型

TCC在互联网公司双十一的性能优化
- 常见的性能优化方案,二阶段异步执行
- 业务比较特殊的场景,二阶段的提交方法同步执行、二阶段的回滚方法异步执行,【双十一不允许退货】
Enjoy Reading This Article?
Here are some more articles you might like to read next: